
Introduction
Creating costumes can be a fun and exciting experience, especially when you can transform into your favorite storybook characters. Today, we have partnered with Elizabeth Hashagen, a local Momee Friend, to show you how to make these fabulous costumes without breaking the bank. Join us in this Fall Fun segment on News 12 to learn more.
The Inspiration
My daughters and I are avid readers, especially when it comes to the books available through Scholastic flyers at school. We adore characters like Fly Guy, Clifford, and Pete the Cat. We thought it would be a blast to dress up as these lovable characters and create costumes that any boy or girl would cherish.

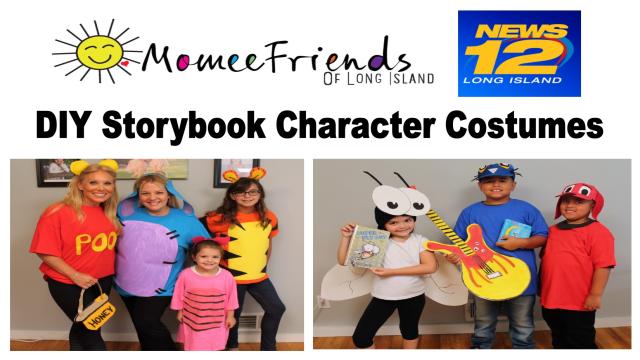
Fly Guy Costume
For the Fly Guy costume, you will need a black beanie cap, oak tag, paper plates, foam pieces, a fine tip black sharpie, and some elastic.
Directions:
- Use the smaller circles at the bottom of the plate to cut out the eyes.

- Cut out two eyelashes and two centers of the eyes using black foam. Attach them to the paper plate with hot glue, ensuring that the eyelashes are attached at the back. Hot glue the eyes to the beanie cap.
- Create the wings by cutting out their shape from oak tag. Loop an elastic piece through the center to allow your child to wear it like a backpack. To secure the elastic, glue a circle to the back. Write “Fly Guy” on a small circle using the black sharpie and add lines on the wings.


Clifford Costume
The Clifford costume is simple yet eye-catching. All you need is a red hat, an oversized red shirt, black foam, black and white acrylic paint, and red felt.
- Use white and black acrylic paint to paint the eyes, nose, and eyebrows onto the hat. Once dry, glue two long ears made of red felt on each side of the hat.
- Cut a collar out of black foam and attach it to the top collar of the shirt using safety pins. This way, you can remove it without damaging the shirt.


Pete the Cat Costume
Pete the Cat is undoubtedly one cool feline! To create this costume, you’ll need an oversized blue shirt, a blue hat, felt, a piece of foam board, and red, yellow, and black acrylic paints.
- Cut out felt pieces for Pete’s face and hot glue them onto the hat. Be cautious as the hot glue will be hot until fully dry.
- To make Pete’s face, cut out two sets of black whiskers and two half circles from black felt. Use white felt to cut out two smaller white half circles and one white triangle. Glue these pieces together to create Pete’s face.
- To construct Pete’s guitar, cut out pieces from foam board and glue them together. Paint the guitar using red, yellow, and black, similar to Pete’s guitar in the books.


Holding Onto Memories
These costumes are not only fun to create but also versatile. Keep them for future use, such as school spirit week or other story-themed events. You never know when your child might need a costume, and these DIY ones are simple and budget-friendly.

Winnie the Pooh, Tigger, Eeyore, and Piglet
Who doesn’t love the enchanting characters of the Hundred Acre Woods? You can easily create costumes for Winnie the Pooh, Tigger, Eeyore, and Piglet using colored t-shirts, headbands, and felt.
Winnie the Pooh Costume
To make a Winnie the Pooh costume, all you need is a red shirt, yellow felt, a headband, stuffing, tan cardstock, and black acrylic paint.
- Cut out large yellow felt letters spelling “P-O-O-H.” Use hot glue to attach them to the red shirt.
- For Winnie the Pooh’s ears, create a double circle shape using yellow felt. Fold it in half and attach it to the headband, adding some stuffing for volume.
- To capture the essence of Winnie the Pooh’s love for honey, craft a honey pot using tan cardstock, yellow felt, and black paint. Attach a ribbon to the top for easy carrying.


Tigger Costume
To become Tigger, you’ll need an oversized orange shirt, yellow and black foam, orange and yellow felt, and black acrylic paint.
- Cut out a large yellow tummy shape from foam and glue it to the front of the orange shirt. Cut out Tigger’s distinctive stripes from black foam and attach them to the shirt.
- Create Tigger’s ears with orange felt, stuffing, and a headband. Cut a double circle shape with a thinner middle section, fold it in half, and attach it to the headband. Paint black accents on the ears.
- Complete the costume by crafting a tail using foam and matching orange t-shirt material. Paint black stripes along the tail for the finishing touch.


Eeyore Costume
Eeyore doesn’t have to be sad anymore with this DIY costume. All you need is an oversized blue shirt, oak tag, black and blue felt, and black and light purple acrylic paint.
- Cut out long Eeyore ears using light blue and light purple felt. Attach them to a headband, ensuring they hang low like a donkey’s ears.
- Create Eeyore’s face by painting a large purple oval on the front of the shirt. Add black foam stripes for extra detail.
- Don’t forget about Eeyore’s tail! Cut a blue felt tail and attach a black felt piece at the bottom. Add a light pink bow for a charming touch.


Piglet Costume
Piglet is an adorable character that can be brought to life with an oversized pink shirt, pink and black acrylic paints, a headband, and pink felt.
- Cut out pig-shaped ears from pink felt and attach them to the headband.
- Paint Piglet’s belly onto the pink shirt, creating a large dark pink area with black stripes for the tummy.


Conclusion
Creating your own storybook character costumes can be a delightful and affordable experience. With some imagination and simple materials, you can bring your favorite characters to life. Join us on News 12 Long Island to see these DIY costumes in action! Don’t forget to check out the full segment here.
Follow us on Pinterest for more crafty ideas and inspiration.

Remember, dressing up isn’t just for Halloween. These costumes can be a hit at any story-themed event or school spirit week. Let your creativity shine and have fun making memories with your little ones.